以前にこちらの記事でReactを勉強しました。

そもそもなぜReactを勉強することにしたかというと僕が業務で開発をしているRuby on Railsでのプロダクトに導入しようということになったからです。なので今回はRuby on RailsにReactを導入する設定をしたので、その手順をまとめていこうと思います。
環境
macOS HighSierra バージョン10.13.4
ruby 2.5.0
Rails 5.1.6
手順
yarnのインストール
まずyarnをインストールします。
yarnはReactと同様にFacebook発で、npmに互換性があるまたはそれ以上のJavaScriptのパッケージマネージャーです。
Homebrewでインストールすることができます。
Homebrewをインストールしていない場合はインストールの手順をこちらの記事で解説していますので参考にしてください。
brew install yarn
Gemfileに追加
Gemfileにwebpackerを追加します。
gem 'webpacker'
その後に
bundle install
を実行します。
次にこれらを実行していきます。
bundle exec rails webpacker:install
bundle exec rails webpacker:install:react
これらをすることで必要な設定ファイルなど自動で生成してくれます。
application.js
/* eslint no-console:0 */
// This file is automatically compiled by Webpack, along with any other files
// present in this directory. You're encouraged to place your actual application logic in
// a relevant structure within app/javascript and only use these pack files to reference
// that code so it'll be compiled.
//
// To reference this file, add <%= javascript_pack_tag 'application' %> to the appropriate
// layout file, like app/views/layouts/application.html.erb

console.log('Hello World from Webpacker')
いろいろ生成されるファイルの1つにapplication.jsがあります。
webpackerを使用する場合にjsファイルはapp/javascripts/packs/に書いていきます。
そして使用する場所に<%= javascript_pack_tag 'application' %>のように書くことで読み込まれます。
試しにapplication.html.erbに追加してみます。
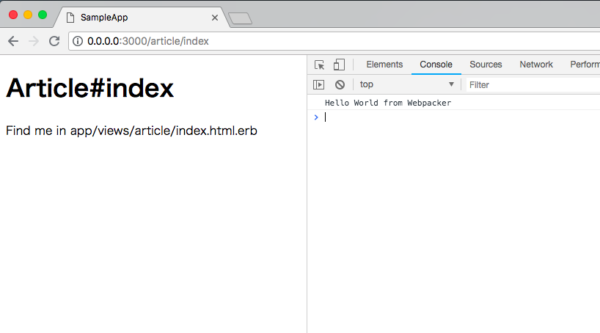
とりあえずテキトーなページを表示させてコンソールを確認したらログが表示されていることが確認できました。
もしエラーが出る場合はサーバーを立ち上げなおすと直る場合が多いです。
Started GET "/article/index" for 127.0.0.1 at 2018-06-24 17:06:57 +0900
Processing by ArticleController#index as HTML
  Rendering article/index.html.erb within layouts/application
  Rendered article/index.html.erb within layouts/application (2.3ms)
[Webpacker] Compiling…
[Webpacker] Compiled all packs in /Users/crz/Desktop/sample/sample_app/public/packs
Completed 200 OK in 7525ms (Views: 7517.5ms)
このようにRailsサーバのコンソールを確認するとWebpackerによってコンパイルされていることが確認できるかと思います。
Reactの記述
先程やったのはただJavascriptのコードを実行しただけなので次はReactで書いたコードを実行できるかどうかを確認していきます。
先程bundle exec rails webpacker:install:reactを実行したときにhello_react.jsxというファイルが作成されているかと思います。
hello_react.jsx
// Run this example by adding <%= javascript_pack_tag 'hello_react' %> to the head of your layout file,
// like app/views/layouts/application.html.erb. All it does is render <div>Hello React</div> at the bottom
// of the page.

import React from 'react'
import ReactDOM from 'react-dom'
import PropTypes from 'prop-types'

const Hello = props => (
  <div>Hello {props.name}!</div>
)

Hello.defaultProps = {
  name: 'David'
}

Hello.propTypes = {
  name: PropTypes.string
}

document.addEventListener('DOMContentLoaded', () => {
  ReactDOM.render(
    <Hello name="React" />,
    document.body.appendChild(document.createElement('div')),
  )
})
このようになっています。
コメントにあるようにapplication.html.erbに<%= javascript_pack_tag 'hello_react' %>を追加すると、ページの最後に「Hello React」とあるdivタグが追加されるようになっています。
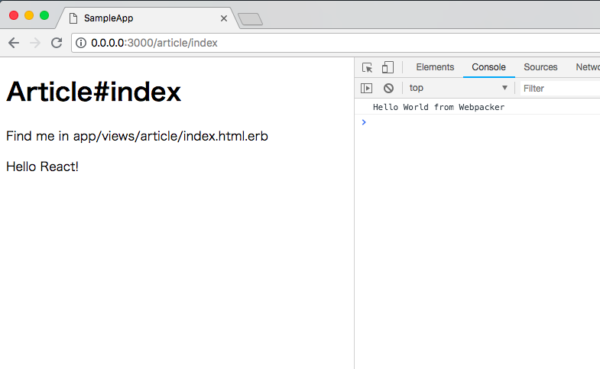
先程の画面に「Hello React」が追加されたことがわかるかと思います。
まとめ
これでRailsでReactを使用できる環境が整いました。意外と簡単に環境が作れたのでよかったです。
今後はjqueryメインでこれまで書かれていたコードをReactに移行していければなと思います。